|
Suzuki SV650
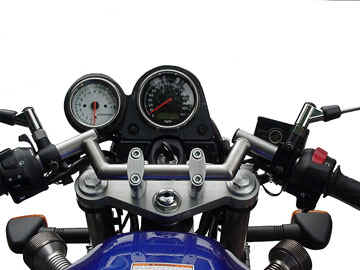
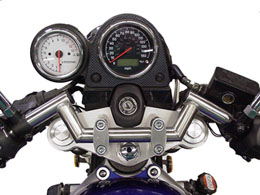
/ GS500F / S1000 -Discontinued- Handlebar does not fit SV650S Return to main page Type #1 and #2 has been discontinued. Designed to clear fork
preload adjusters on all models. Lots of pictures below. Price and ordering information shown below.
Type #2 handlebar
Please Note: SV1000
To order, order
online via secure server or call Suburban at 440-951-6555 .
During
the check out process you will be asked for the model
year of your bike. 4-24-2018: Type
2 bar
|
|
|
Return to main page
Return to Handlebar page
Sample handlebar installation instructions.
Suzuki GS 500F, SV-650 and SV-1000 type #2 handlebar kit
Installation instructions - read through completely before beginning:
1- As a precaution cover the gas tank with padding.
Two thick bath towels folded in half work well.
Late model SV650 and all SV1000 and GS500 do not need turn signal kit. Go to step #3.
2- Relocate the turn signals: Remove the headlight lens/chrome ring from the plastic shell, unplug and set aside. Install the stainless brackets onto the lower triple clamps. Torque to 16.5 foot pounds. The slotted holes should run parallel to the ground. The forward facing tab should be inboard of the pinch bolts.
On either side follow the wires from the turn signal into the headlight housing & unplug from the harness. Use a 14mm open end wrench to remove the turn signal from its factory mounting bracket.
Install the turn signal on the new bracket. Rotate until the flats fit through the slotted hole in the bracket. The light should be pointing straight forward.
Install the thin stainless washer and factory nut. Reconnect the wires. Repeat on the other side. Check turn signal function then re-install the headlight.
End turn signal instructions.
3- Remove factory handlebar: Left side: Remove the mirrors as a precaution. Disconnect the clutch cable from the clutch lever.
Remove both bar-end weights and set aside. Inside the factory HB is a rubber sleeve (expander plug) and hex flange nut. The rubber plug will come out with a little fiddling. Try the hooked end of a bicycle spoke or similar tool. The other loose hex flange nut acts as a spacer between the weight and the rubber plug to position the rubber plug away from the very end of the HB.
The left grip will come off using a blast of compressed air to float the rubber off of the tube. A bicycle spoke or round shank screw driver can be wiggled up under the grip and rolled around to free up the adhesive.
Unplug the clutch interlock wires from the clutch lever housing. Remove the clutch lever. The electrical switchgear is in two halves and is held together by two Phillips screws.
Note how the choke cable and lever assemble into the switchgear housing. These parts will tend to fall away from the switchgear as it is removed. Remove the switchgear.
Note the hole in the handlebar tube and matching locator tab on the switchgear body. The left side of the handlebar should now be empty.
Right side: Unplug the brake light wires from the brake lever housing. Remove master cylinder / brake lever housing assembly. Remove two screws that hold the switchgear / throttle assembly.
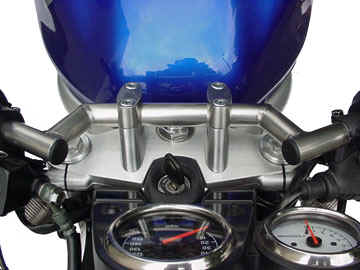
4- Install new Handlebar: SV1000 - Right side used marked hole
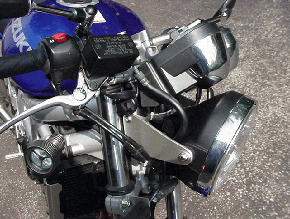
The brake hose should run on the inside of the headlight bracket. The throttle cables should run outside and under the bracket. See the picture for detail.
Slip the new HB into the throttle / switchgear assembly. Attach the HB to the triple clamp, but do not tighten down.
The basic plane of the handlebar should run parallel with the seam between the upper and lower halves of the HB clamp, plus and minus. On our test bike the HB is tipped slightly down in front. This can be adjusted to your preference at any time.
Sit on the bike. Visually check left / right positioning of the HB relative to the HB clamps. Rotate the bars in the clamps to a comfortable angle.
Tighten down the four HB attach bolts to 16-18 foot lbs of torque. Make sure there is an equal gap between the front and back of the HB clamp castings.
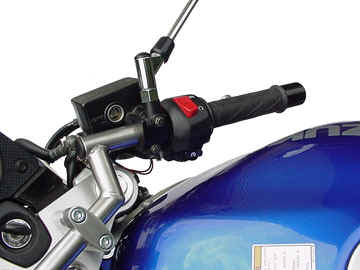
Install electrical switchgear on both sides. The pins in the plastic housing must fit into the holes in the HB.
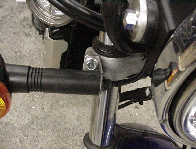
Remember there are wires running to both the clutch and brake lever. Both wiring harness plugs will come close to the triple clamp, but should not touch it.
In this picture you can see the clutch cable clearance relative to the tachometer and the clutch switch -----> electrical plug just left of the triple clamp.
Install clutch lever and cable. Install left rubber grip. Position front brake assemble and tighten bolts. A small amount of HB should show at the outboard end of the twist grip. Install the bar end weights.
Check to make sure everything operates freely:
1. Does the throttle open & close freely?
2. Does the taillight activate with the front brake lever?
3. Is there adequate slack in the clutch cable?
4. Does the choke lever move properly?
Please note: the right side electrical switch gear hole is intentionally rotated to allow the brake lever to be set lower without hitting the throttle cable.
Return to main page
Return to Handlebar page