|
This product has been discontinued. K1200GT
2003-2005
On this bike,
bleeding the brake lines is a job for the trained
technicians at a BMW dealer.
K1200GT
(2003-2005)
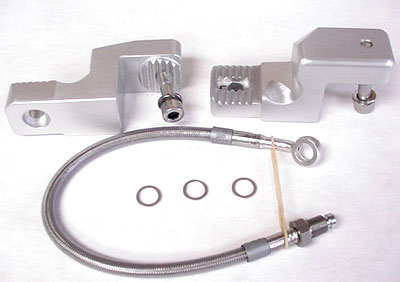
Installation: K1200GT Type 2 Bar backs Read through completely before you start. Be sure to wear safety glasses.
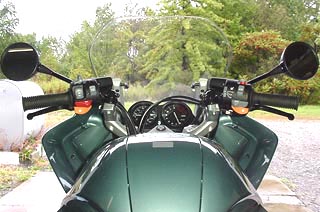
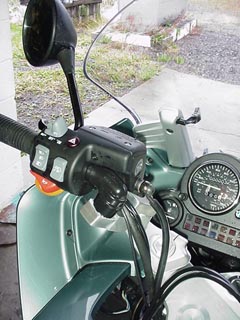
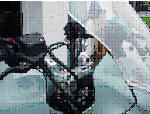
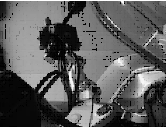
We recommend that unless you are highly skilled, this work should be done by a BMW dealer. Right side installation is a bit more complicated than the left. The throttle cables must be moved from in front of the triple clamp to behind the triple clamp. A longer brake hose requires bleeding of the servo brake system which is located under the saddle. Note the amount of free play in the throttle cables. They do not fight each other. The twist grip can be turned slightly without moving the throttle bodies. This is adjusted by the threaded fittings pictured at right, picture # (1). The cables must be removed from the twist grip (2). There are four screws that hold the twist grip together (3). Each is unique and must go back where it came from. The right side mirror must be removed to access one of the screws (4). Once the cables are free from the twist grip, they can be lead around to the driver’s side of the triple clamp (5). -On the right side there is one wiring harness tie wrap to remove. Do this now -Using a 6mm Allen wrench remove the hand grip casting from the riser casting. Install the right adapter block to the riser casting using the 45mm stainless bolt and lock washer provided in the kit. Tighten to 20 Newton meters. -Move the hand grip into position on the adapter, checking the wiring for slack. Attach the hand grip using the factory 50mm bolt and washer. Turn lock to lock checking for wiring slack. Install tie wraps on wiring as needed. Under the gas tank, there are several additional inches of wiring harness tie wrapped to the frame. This extra length should nor be needed. -Install the throttle cables in the reverse order. First attach the "open" cable end fitting to the twist grip. Lead the cable along the guide groove and thread in the adjuster all the way. -Next, attach the "close" cable end fitting to the twist grip and lead the cable along the guide groove and snap the barrel fitting into the retaining fingers. -Turn the "open" adjuster to remove excess slack from both of the cables. When adjusted properly there should be a small amount of free play in the cables, as before you started, because.... The "close" cable performs the additional function of tripping the cruise control off when the twist grip is closed completely. When adjusted correctly you should be able to hear the micro switch click when the throttle is turned slightly past the closed position
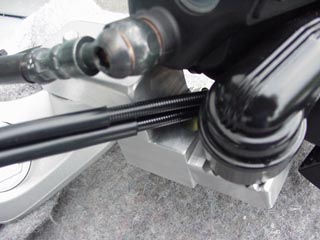
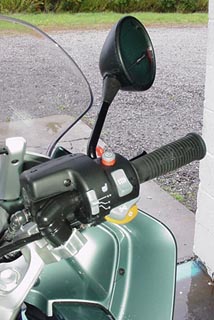
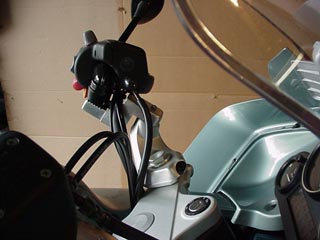
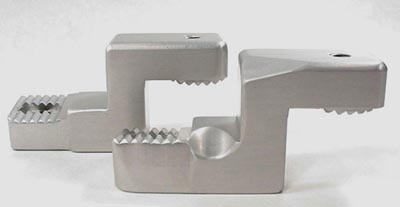
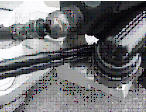
Brake Hose Installation: The brake hose has a banjo fitting at the handlebar end requiring two crush washers. The lower end is an in-line compression fitting. The angle-cut nose seals in the manifold when the lock down nut is tightened. No washer is required. On our test installation we did a complete brake system bleed. This may not be necessary. The servo pump unit, mounted under the saddle, has three bleeder fittings. The right side fitting leads to the front brake fluid tank. Pumping brake fluid into the right side bleeder should push fluid up to the tank and purge the air from the new line. Be sure to have a vacuum pump at the tank to avoid overfill and spillage. Left side installation: Picture #1 shows the 10 degree rotation in the adapters. The left adapter is on the left, right on the right. Picture #2 is a side view with the right adapter in front. An angle cut on the front half provides clearance for the brake master cylinder. Two radius cuts allow for throttle cable clearance. Notice that the holes in the BMW parts and our parts are at a 10 degree angle front to back. -Place bath towels or other protective material over the gas tank and fairing plastic parts near the handlebars. On the left side near the steering head there are three tie wraps that should be cut away to allow slack in the wiring. Use a small diagonal cutter to remove these. -Using a 6mm Allen wrench remove the hand grip casting from the riser casting. The hand grip can rest on the towel and hang by its cables. The center picture just above shows the throttle cables in the original position in front of the triple clamp. These are longer replacement cables that are no longer available. The right picture ,just above, shows the stock cables moved to the driver’s side of the triple clamp, as described on page one. -See picture #3. Install the left adapter block to the riser casting using the 45mm stainless bolt and lock washer provided in the kit. Tighten to 20 Newton meters or 15 -16 foot pounds. -In the middle picture you can see the wiring is lead behind the triple clamp and clutch hydraulic hose is in front of the triple clamp. At right, the clutch hose may also run behind the triple clamp. -Move the hand grip into position on the adapter, checking the wiring for slack. Attach the hand grip using the factory 50mm bolt and washer. Turn lock to lock checking for wiring slack. Install tie wraps on wiring as needed. The left side is finished.
END:
|